
Automating System Memory Usage Information and Storing in a Database
July 7, 2023 • 8 minutes • 1649 words
As system administrators and developers, understanding system memory usage is crucial for optimizing performance and identifying potential issues. However, constantly monitoring and manually recording memory information can be time-consuming and prone to human error. In this tutorial, we’ll explore how to automate the collection of system memory usage information and store it in a database using Python. By doing so, you’ll have a centralized and reliable source of memory data for analysis and troubleshooting.
Why Store System Memory Usage Information in a Database?
Storing system memory usage information in a database offers several advantages:
- Centralized Data Storage: Instead of scattered log files or manual notes, a database provides a centralized repository for memory usage information. This makes it easier to access and analyze data.
- Historical Analysis: With a database, you can track memory usage over time and perform historical analysis. This helps identify trends, detect patterns, and troubleshoot memory-related issues.
- Data Integration: Storing memory information in a database enables integration with other tools and systems. You can build custom dashboards, generate reports, or connect with monitoring systems for real-time alerts.
Now that we understand the benefits of storing memory information in a database, let’s dive into the implementation.
Prerequisites
To follow along with this tutorial, you’ll need:
- Basic to intermediate knowledge of Linux commands.
- Basic knowledge of Python programming language.
- Familiarity with SQL and databases.
- Version control software (optional but recommended).
- Python virtual environment & clone the repo for source code (instructions here )
Understanding the Scripts
To automate the process of collecting system memory usage information and storing it in a database, we’ll be using the following scripts:
cmds_file.json: This JSON file contains the commands to retrieve memory-related information from the system.csv_script.py: This Python script executes the commands fromcmds_file.json, collects system memory information, and stores it in a CSV file.create_sqlite.py: This script creates an SQLite database and defines a table to store memory information.main.py: This script processes the data from the CSV file and inserts it into the SQLite database.data_scheduler.py: This script schedules the execution ofmain.pyat a specific time interval to automate data storage.read_sqlite.py: This script reads and retrieves memory information from the SQLite database.
Step 1: Collecting System Memory Information
The first step is to collect system memory information using the csv_script.py script. This script reads the commands from the cmds_file.json file, executes them, and stores the output in a CSV file.
To begin, let’s examine the cmds_file.json:
{
    "os_flavor": "cat /etc/*release | grep -iw \"name\" | cut -d= -f2 | awk -F '\"' '{ print $2 }'",
    "mem_cmd": "free -h | grep -iw 'mem' | cut -d: -f2 | tr -s ' ' | sed -E \"s/\\s+/,/g\" | sed -E \"s/^,//\" | sed -E 's/^,//' | sed -E \"s/$/,$(date '+%F %I:%M %p')/\""
}
The cmds_file.json contains two commands: os_flavor and mem_cmd. The os_flavor command retrieves the Linux operating system flavor (e.g., Ubuntu, RedHat, or other), while the mem_cmd command retrieves the system memory information along with the date and time.
Next, let’s explore the csv_script.py:
import os
import json
import platform


def execute_cmds(cmds_file_path):
    try:
        with open(cmds_file_path, 'r') as f:
            cmds_dict = json.load(f)

        system = platform.system()
        if system == 'Linux':
            os_name = os.popen(cmds_dict['os_flavor']).read().strip()
            if os_name == 'Ubuntu' or os_name == 'RedHat':
                output = os.popen(cmds_dict['mem_cmd']).read().strip()
                csvfile_path = 'mem_info.csv'
                with open(csvfile_path, 'w') as f:
                    f.write(output)
                return True
            else:
                print(f'Found different Linux flavor: {os_name}')
        else:
            print(f'Unsupported operating system: {system}')
    except Exception as e:
        print(f'This error occurred: {e}')


if __name__ == '__main__':
    execute_cmds(os.path.abspath('cmds_file.json'))
    print('Data stored successfully in CSV file!')
The execute_cmds function reads the commands from the cmds_file.json file, executes them using os.popen, and captures the output. It checks the Linux operating system flavor and stores the memory information in a CSV file named mem_info.csv.
To run the script, execute the following command in your terminal:
python csv_script.py
After running the script, you should see a message indicating that the data has been stored successfully in the CSV file.
Step 2: Creating an SQLite Database
SQLite database is a lightweight, serverless, and self-contained database engine we used in this tutorial. It provides a simple and efficient way to store and manage structured data. SQLite is chosen for its ease of use, portability, and compatibility with Python, enabling the creation of a local database file, memory_info.db, as a centralized repository for the system memory information.
Next, we need to create an SQLite database to store the system memory information. The create_sqlite.py script handles this task.
Let’s examine the create_sqlite.py script:
import sqlite3


def create_database():
    conn = sqlite3.connect('memory_info.db')
    cursor = conn.cursor()

    cursor.execute("""CREATE TABLE IF NOT EXISTS memory (
                        log_id integer PRIMARY KEY AUTOINCREMENT,
                        total_mem TEXT,
                        used  TEXT,
                        free  TEXT,
                        shared INTEGER,
                        buff_cache  TEXT,
                        avail TEXT,
                        datetime TEXT
                    )""")

    conn.commit()
    conn.close()


if __name__ == '__main__':
    create_database()
    print('Database & table created!')
The create_database function connects to or creates an SQLite database file named memory_info.db and creates a table named memory within that database.
To create the database, execute the following command in your terminal:
python create_sqlite.py
After running the script, you should see a message confirming that the database and table have been created.
Step 3: Storing Data in the Database
With the CSV file containing the system memory information and the SQLite database set up, we can now store the data in the database using the main.py script.
Here’s an overview of the main.py script:
import os
import csv
import sqlite3
from csv_script import execute_cmds


def process_data():
    try:
        csvpath = os.path.abspath('mem_info.csv')
        cmds_jsonpath = os.path.abspath('cmds_file.json')
        execute_cmds(cmds_jsonpath)

        with open(csvpath) as f:
            csvfile = csv.reader(f, delimiter=',')
            all_values = []
            for row in csvfile:
                all_values.append(tuple(row))

        conn = sqlite3.connect('memory_info.db')
        cursor = conn.cursor()

        insert_query = """INSERT INTO memory (total_mem, used, free, shared, buff_cache, avail, datetime) values (?, ?, ?, ?, ?, ?, ?)"""
        cursor.execututed(insert_query, all_values)

        conn.commit()
        conn.close()
        return 'Data successfully stored in the database!'
    except Exception as e:
        return f'Something went wrong: {e}'


if __name__ == '__main__':
    result = process_data()
    print(result)
The process_data function reads the data from the CSV file and inserts it into the SQLite database using the INSERT query. The execute_cmds function from csv_script.py is called to update the CSV file with the latest memory information before processing the data.
To store the data in the database, execute the following command in your terminal:
python main.py
Upon successful execution, you should see a message indicating that the data has been stored in the database.
Step 4: Automating Data Storage
To automate the data storage process, we utilize the schedule library in Python. The schedule library allows for the scheduling and execution of tasks at specific time intervals or predetermined times. It provides a simple and intuitive way to define scheduled events, making it convenient for automating recurring actions.
Manually executing the script each time to store memory information in the database can be tedious. To automate this process, we can schedule the execution using the data_scheduler.py script.
Here’s an overview of the data_scheduler.py script:
import time
import schedule
from main import process_data


def schedule_data():
    result = process_data()
    print(result)

schedule.every().day.at('02:00').do(schedule_data)
print("Scheduler is running...")

while True:
    schedule.run_pending()
    time.sleep(1)
The schedule_data function utilizes the process_data function from main.py to store memory information in the database. In this example, we have set it to automatically run on a daily basis at 2:00 AM, ensuring regular and automated data storage.
To start the data scheduler, execute the following command in your terminal:
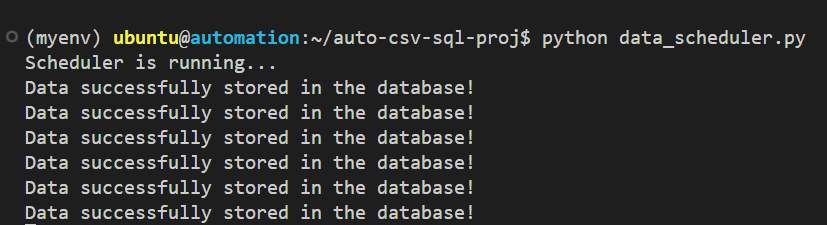
python data_scheduler.py
The scheduler will run continuously in the background, executing the data storage process at the specified time interval.
Step 5: Reading Data from the Database
To retrieve and analyze the stored memory information, we can use the read_sqlite.py script.
Here’s an overview of the read_sqlite.py script:
import sqlite3


conn = sqlite3.connect('memory_info.db')
cursor = conn.cursor()

query = """SELECT * FROM memory"""
cursor.execute(query)

result = cursor.fetchall()

for row in result:
    print(row)

conn.close()
The script connects to the SQLite database using a cursor and executes a query to fetch all rows from the memory table. It then prints the retrieved data.
To read the data from the database, execute the following command in your terminal:
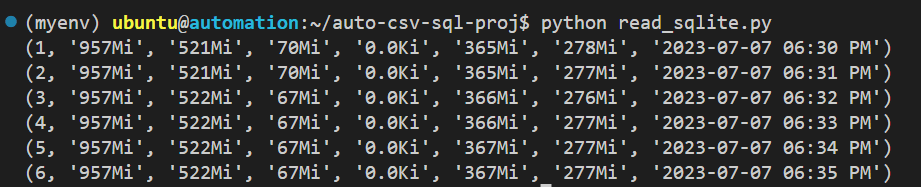
python read_sqlite.py
You should see the memory information displayed in the terminal like this:
Conclusion
By automating the collection and storage of system memory usage information, we have simplified the process of monitoring and analyzing memory data. Throughout this tutorial, we covered the steps required to automate system memory usage information storage using Python scripts, CSV files, and an SQLite database.
Key Points:
- Centralized and Reliable: Automating memory information storage provides a centralized and reliable source of data for analysis and troubleshooting.
- Historical Analysis: The stored data allows for historical analysis, helping to identify trends, patterns, and memory-related issues over time.
- Integration with Other Tools: Storing memory information in a database enables integration with other tools and systems, such as custom dashboards, reports, and real-time monitoring systems.
- Efficient Monitoring and Optimization: Automating the process frees up time for system administrators and developers to focus on analyzing memory data, optimizing performance, and identifying memory-related issues efficiently.
Extensions:
Here are some potential extensions to consider for further enhancing the project:
- Implementing data visualization to create insightful charts and graphs based on the collected memory information.
- Setting up alerts and notifications to be triggered based on specific memory usage thresholds. Enhancing the data retrieval process by implementing advanced - SQL queries for specific analysis requirements. Integrating with external monitoring systems or cloud platforms for seamless and scalable memory monitoring and analysis.
- Implementing data backups and disaster recovery mechanisms to ensure data integrity and availability.
- By leveraging this automated approach, system administrators and developers can streamline their memory management processes, make data-driven decisions, and ensure optimal system performance.
Remember, this tutorial assumes a beginner to intermediate level of knowledge in Linux commands, Python programming, SQL, and version control. Feel free to explore further, customize the scripts, and adapt them to your specific needs. Happy automating!